Configuration

Estimated reading: 2 minutes 634 views

Configuration

Go to WordPress Admin Dashboard> Points Tab> Addons Tab

Activate ‘cashCred Addon’

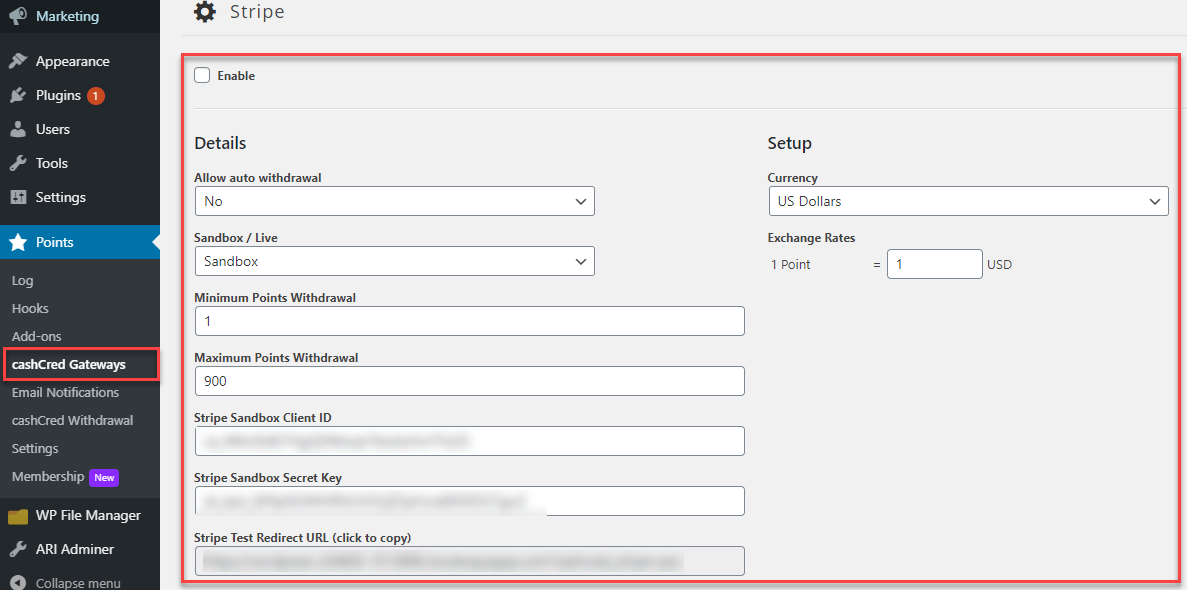
  • Next is to go ‘CashCred Gateways’ tab
  • Then go for ‘Stripe’ option
  • Checkmark on ‘Enable’ option to activate Stripe
  • In ‘Details’ section, set ‘Allow auto withdrawal’. In case you selected ‘yes’ so the stated request will not go for approval at admin end and becomes approved automatically
  • Set ‘Currency’ from dropdown and set ‘Exchange Rate’ against each point. Therefore, points will be exchanged to currency
  • Select ‘Sandbox’ for testing transaction and ‘Live’ for actual transaction
  • Set ‘Minimum Points Withdrawal’, (least no of points to perform transaction)
  • Set ‘Maximum Points Withdrawal’, (Maximum no of points to perform transaction)
  • Go to https://dashboard.stripe.com/test/settings/connect and get the test mode client id

Stripe Account Settings

  • Copy ‘Stripe Test Redirect URL’ from last option of above screen and paste it in your Stripe Account> ‘Settings’ menu
  • Here click on ‘Settings’ under ‘Connect’ Section
  • Scroll down to the end of page, click on ‘Add URL’ button  and paste the copied ‘Stripe Test Redirect URl’ here
  • Incase you have selected ‘Live Environment’ then go to ‘Developers’ tab > Webhooks > Add Endpoint. Paste the copied Stripe Redirect URL here
  • Select all transfer events and click on add events

myCRED Settings

  • Now go to ‘Points’ > Settings
  • Enable or Disable payment debugging log
  • Update the settings